

Report Settings
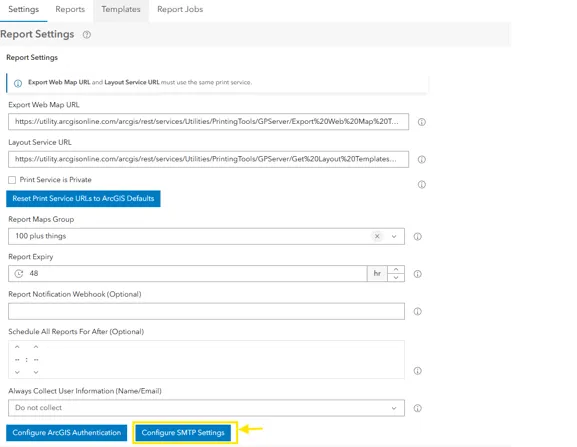
The Report Settings have been expanded as of version 3.2.6 allowing greater flexibility with authentication.
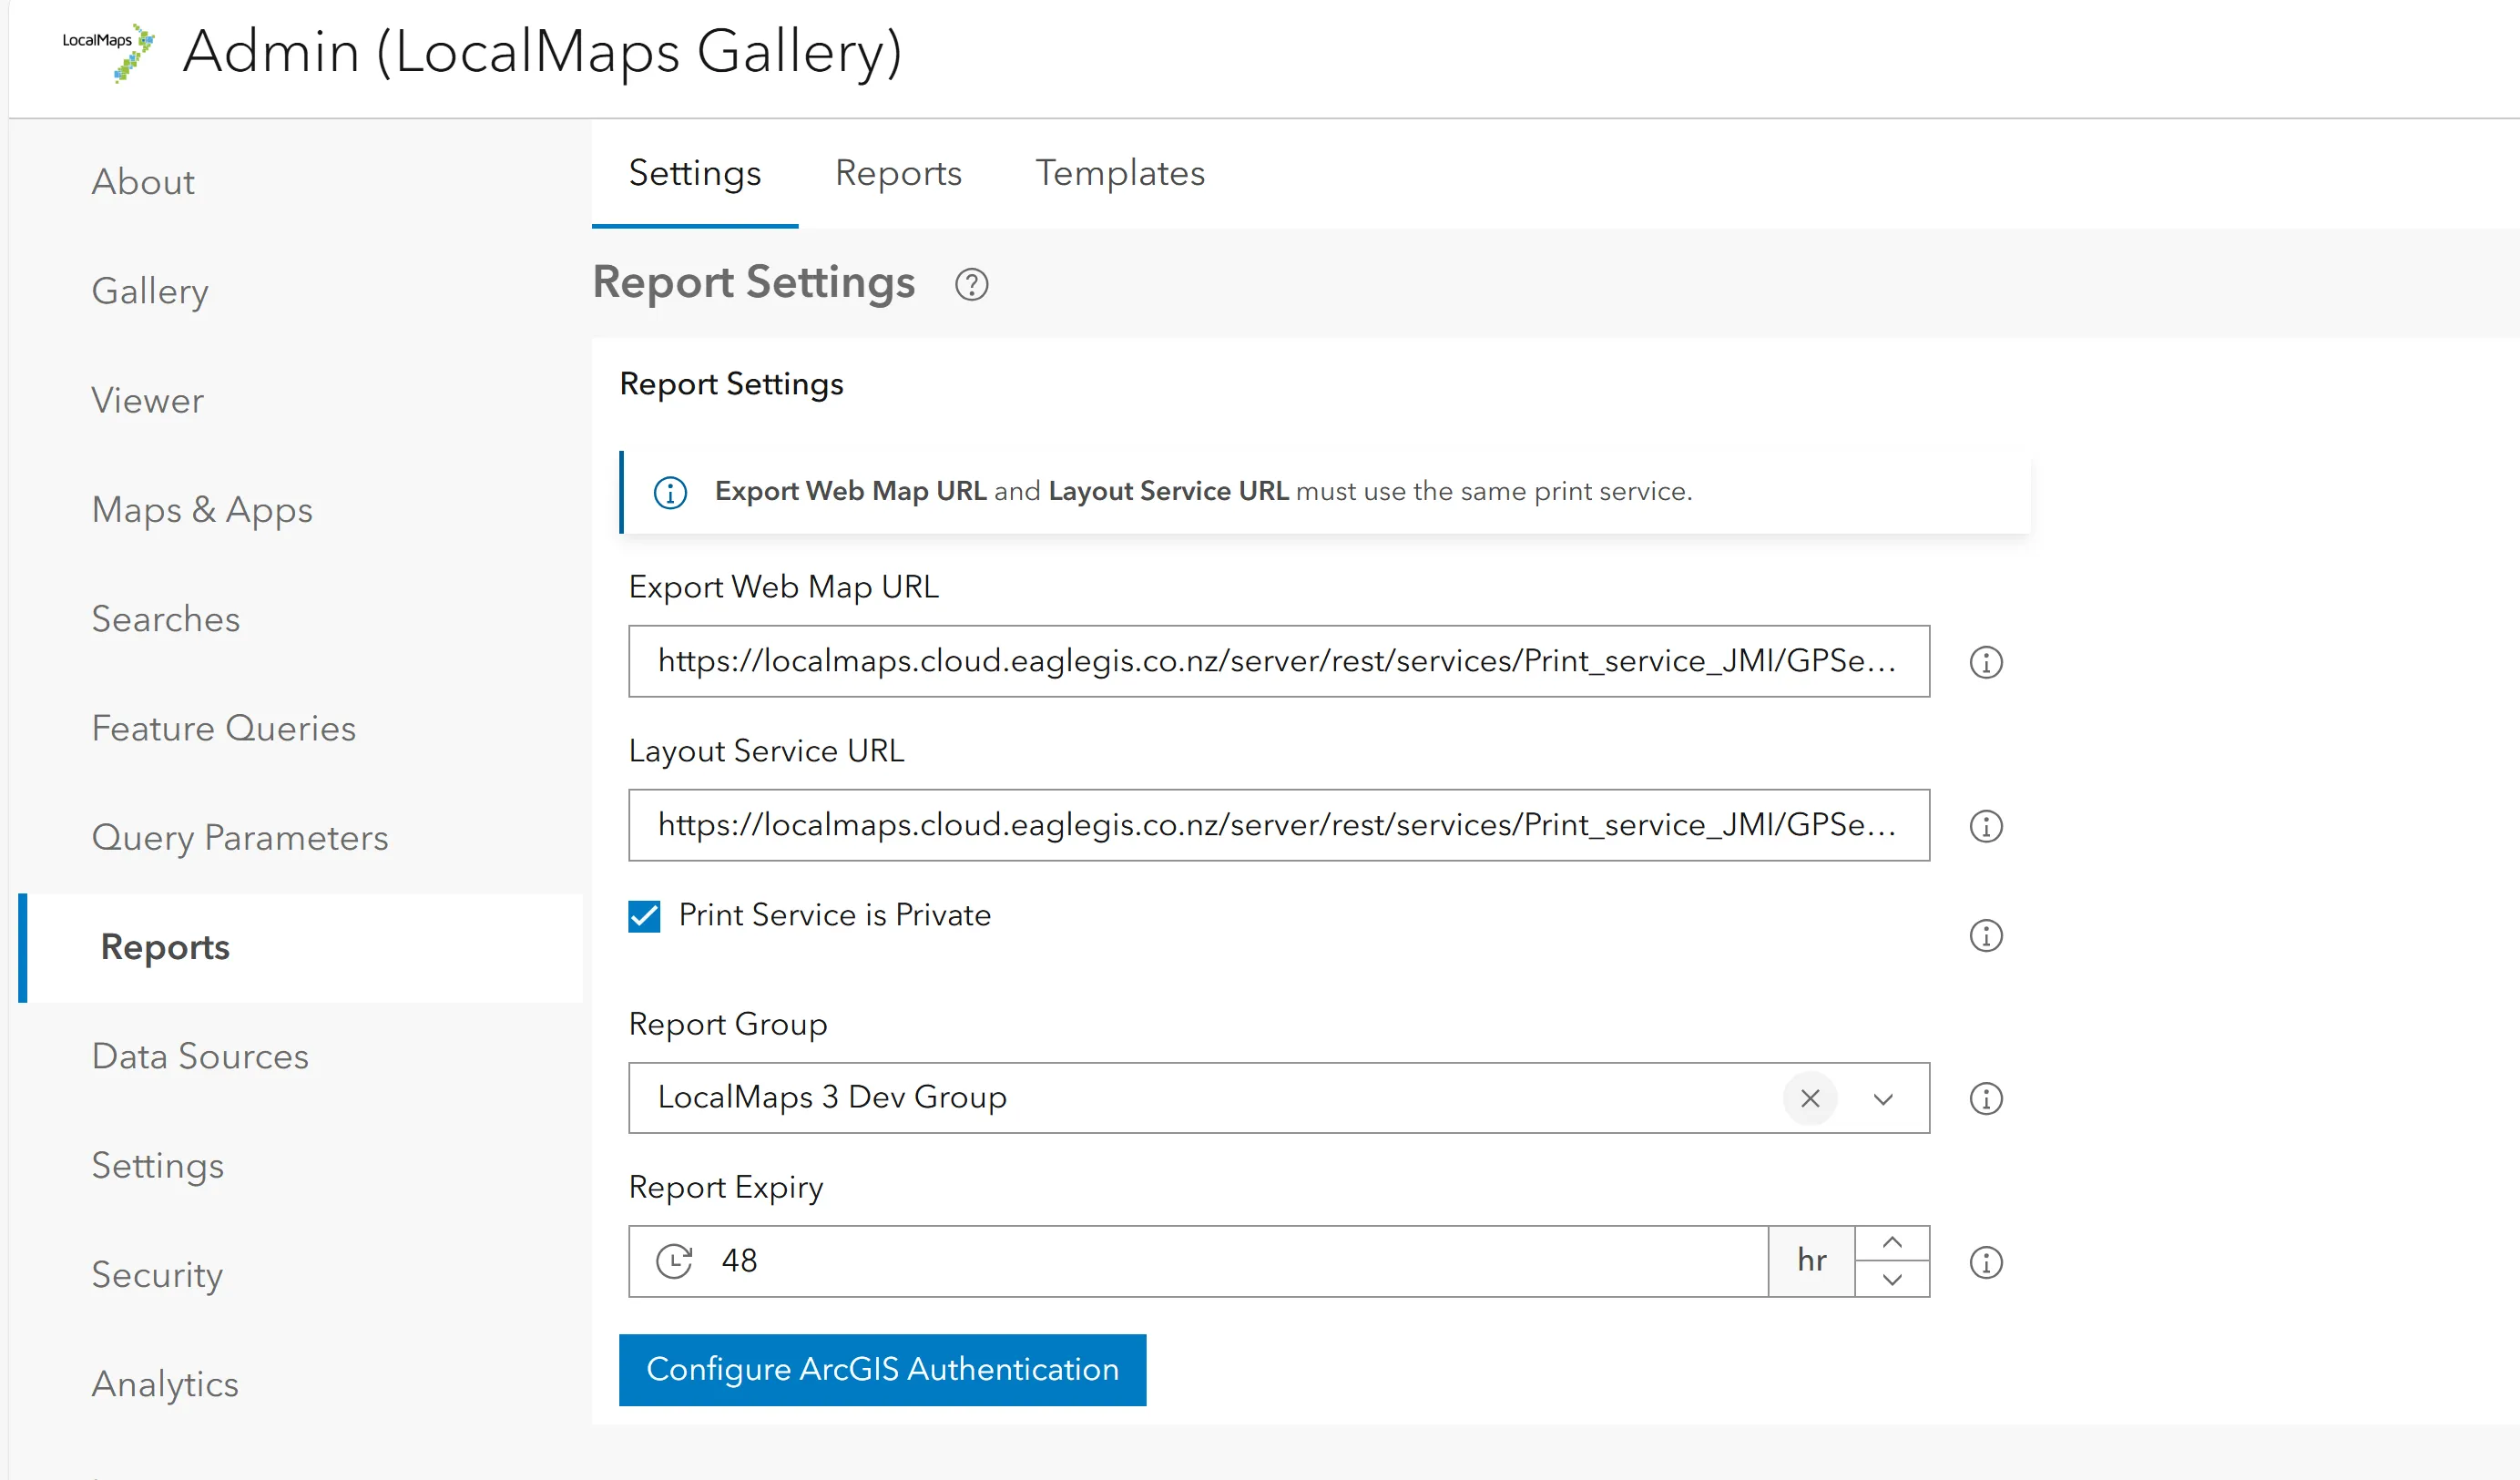
Print Service
By default LocalMaps uses ArcGIS online services for generating reports. If you have a custom print service you wish to use, then input the Export Web Map URL and Layout Service URL in the textbox. You must provide both of these URLs and both of them must use the same print service.
Private Print Service
If your print service is private then check this box. Note that private print services must be published to the same portal that LocalMaps is deployed to due to the way ArcGIS authentication works.
Report Group
This is the content group that the maps will pull from. Ensure that this group should have all the maps and layers that you want to include in your reports. These maps must be shared publicly although they may have private layers on the map.
Report Expiry
Files generated by report jobs are deleted this many hours after generation.
Configure ArcGIS Authentication
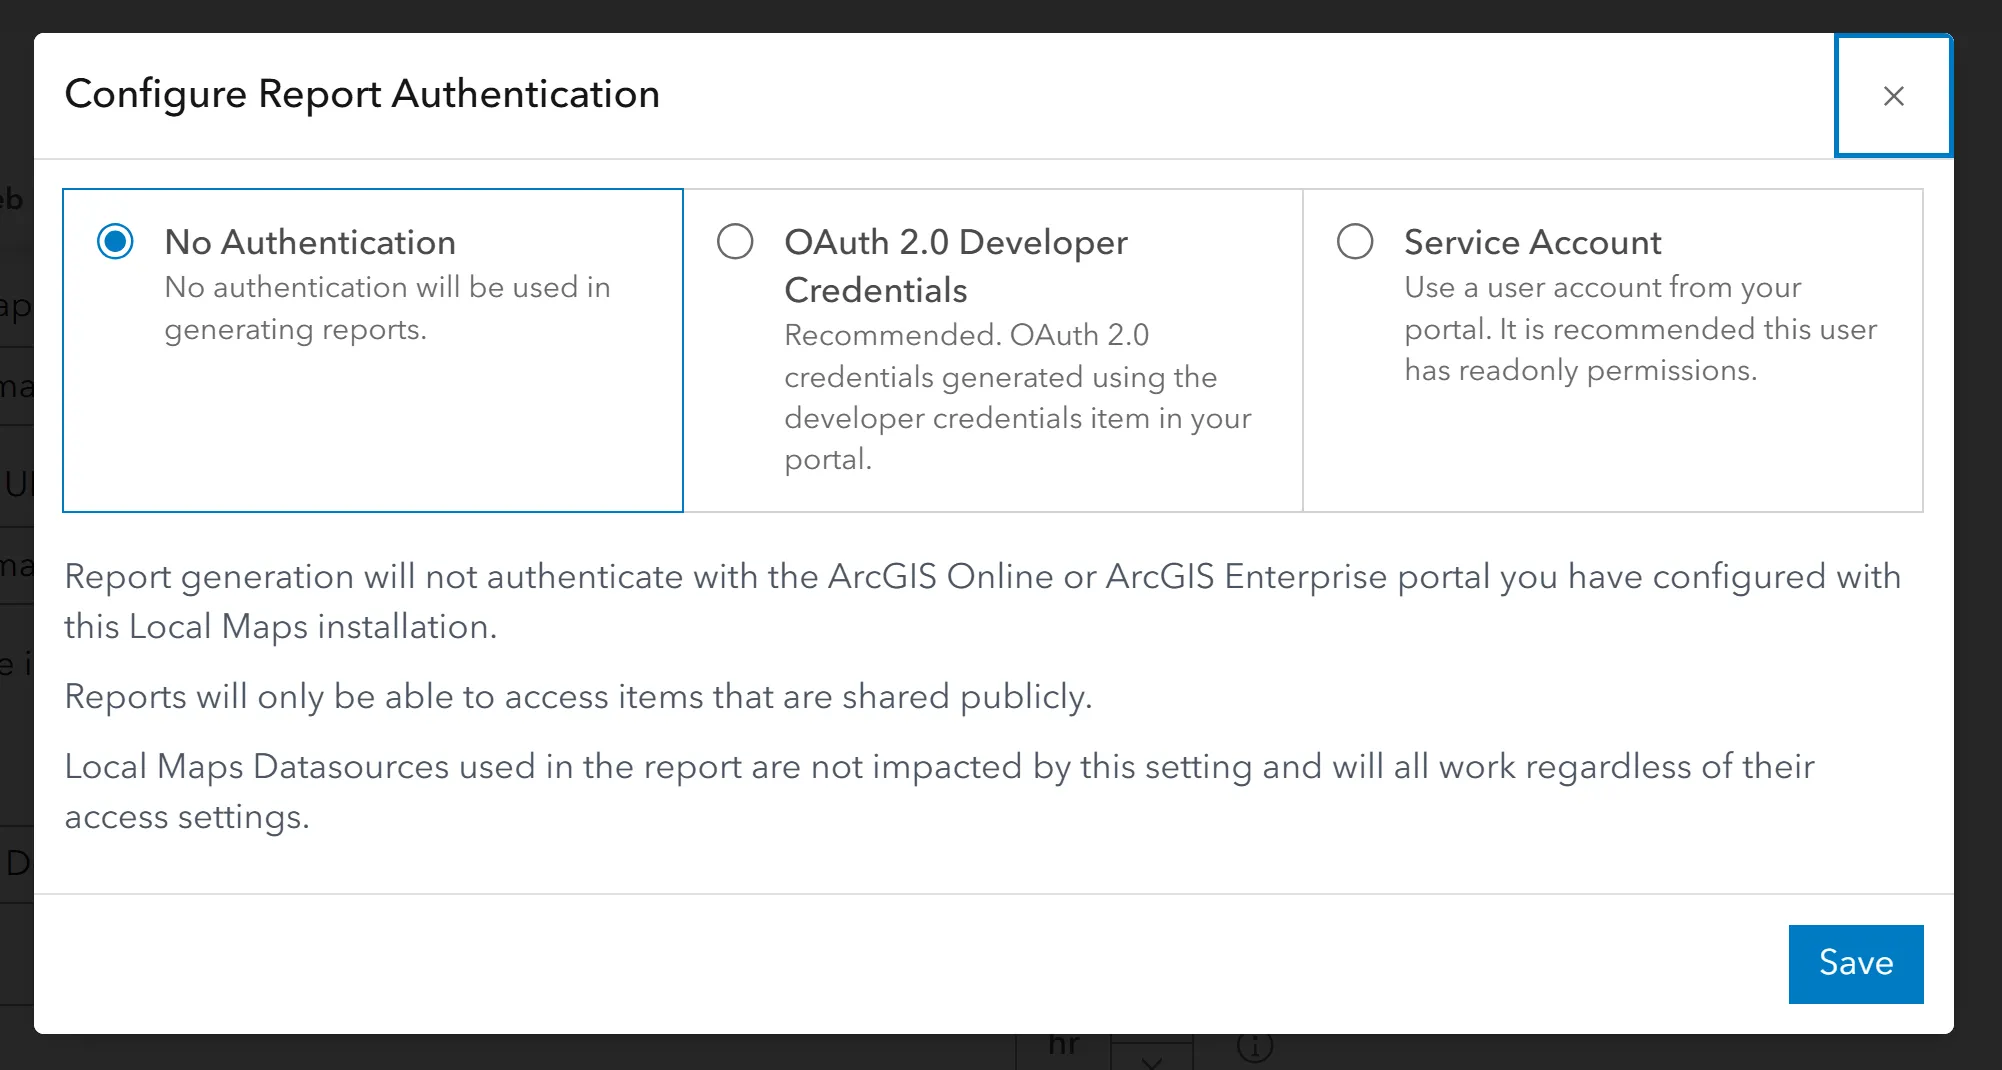
If you require Reporting to access layers on the map that are private then setup here is required. There are three options you can choose from.
No Authentication
This is the default selection which means Report generation will not authenticate with ArcGIS Online or ArcGIS Portal. Reports can only access items that are shared publicly.
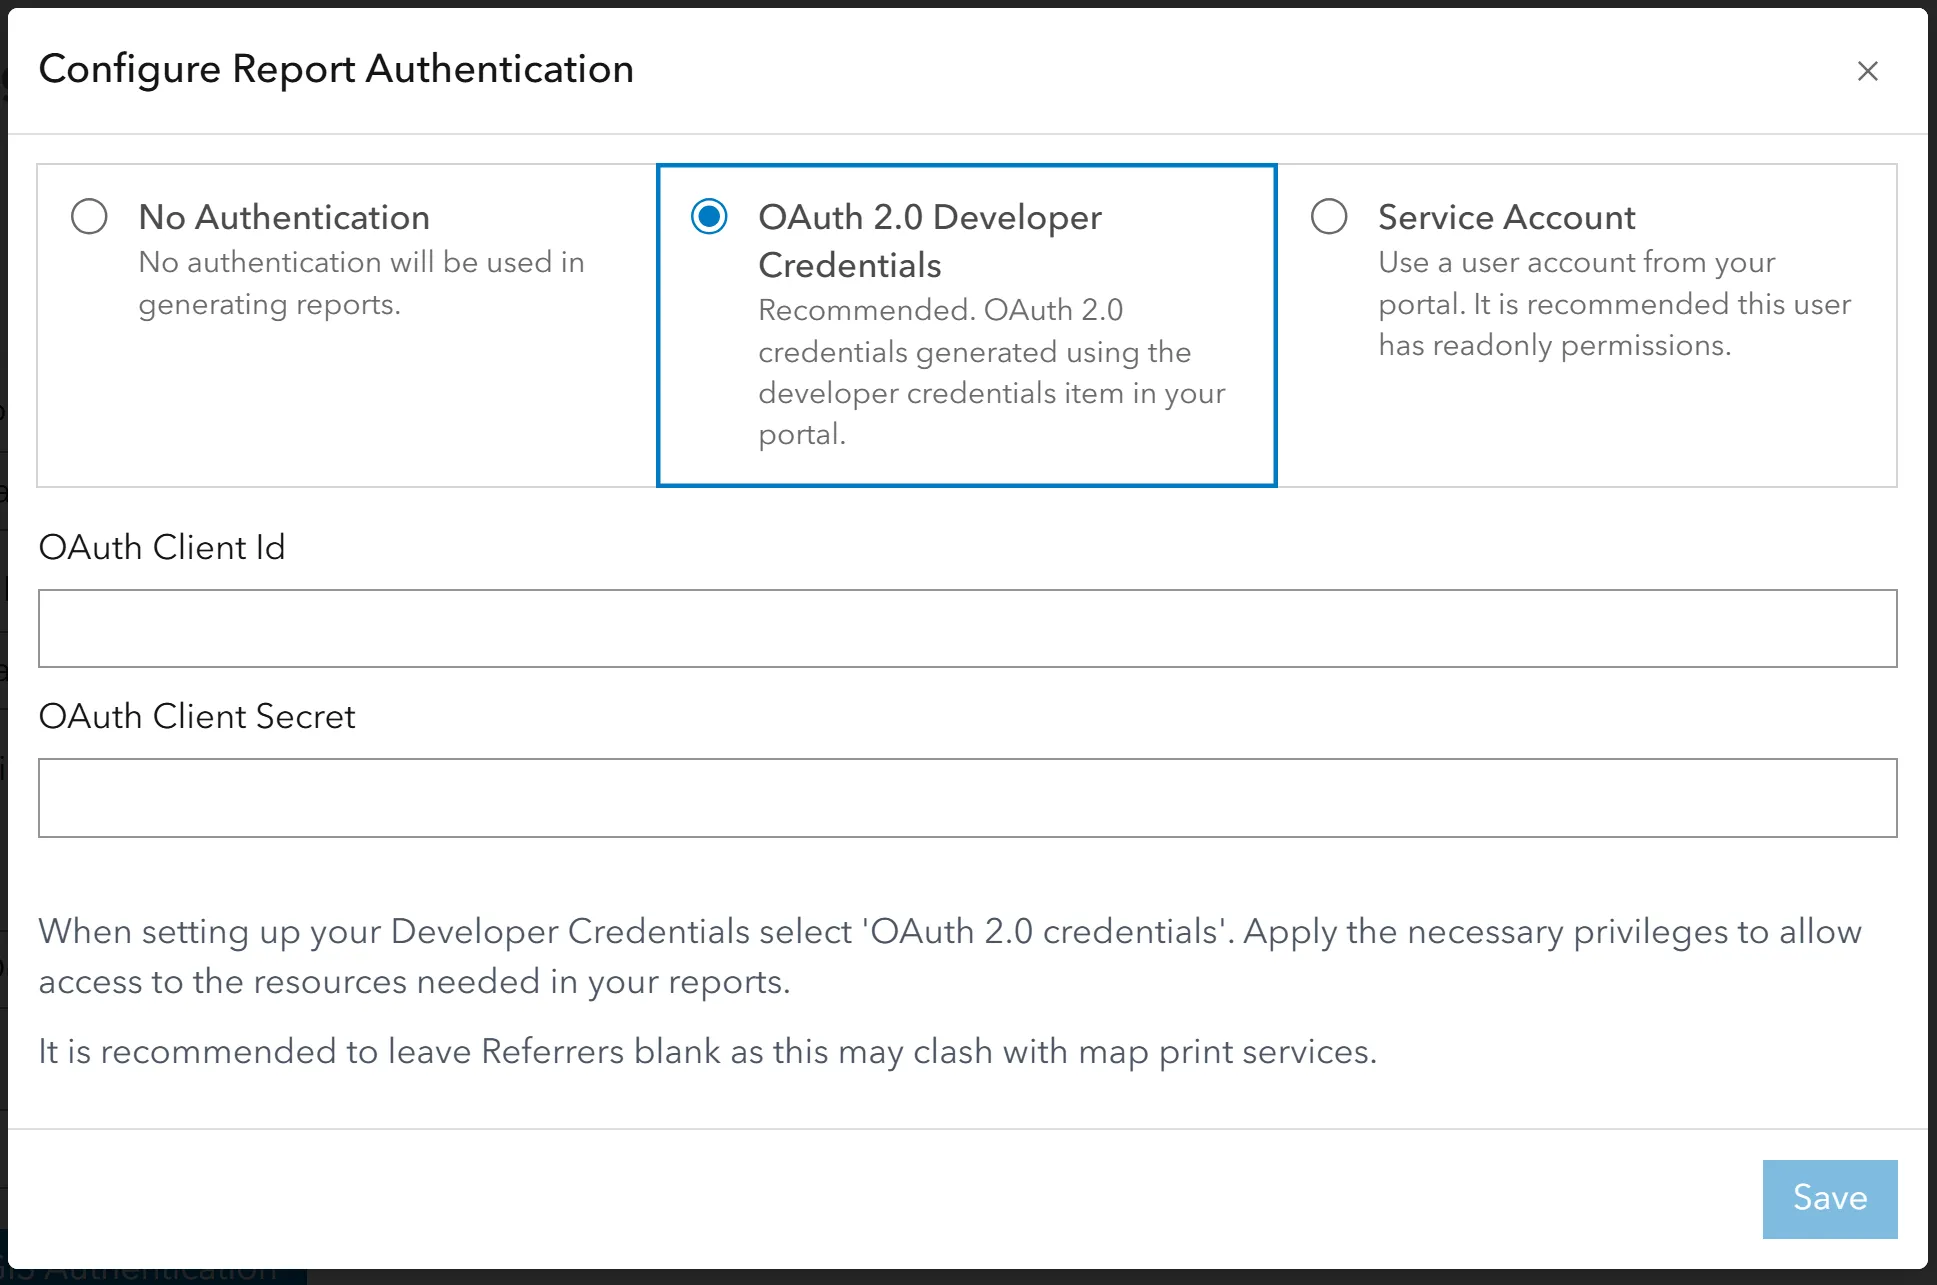
OAuth 2.0 Developer Credentials
Refer to the Esri documentation here for setting up developer credentials. Input the Client ID and Client Secret into the fields and click save.
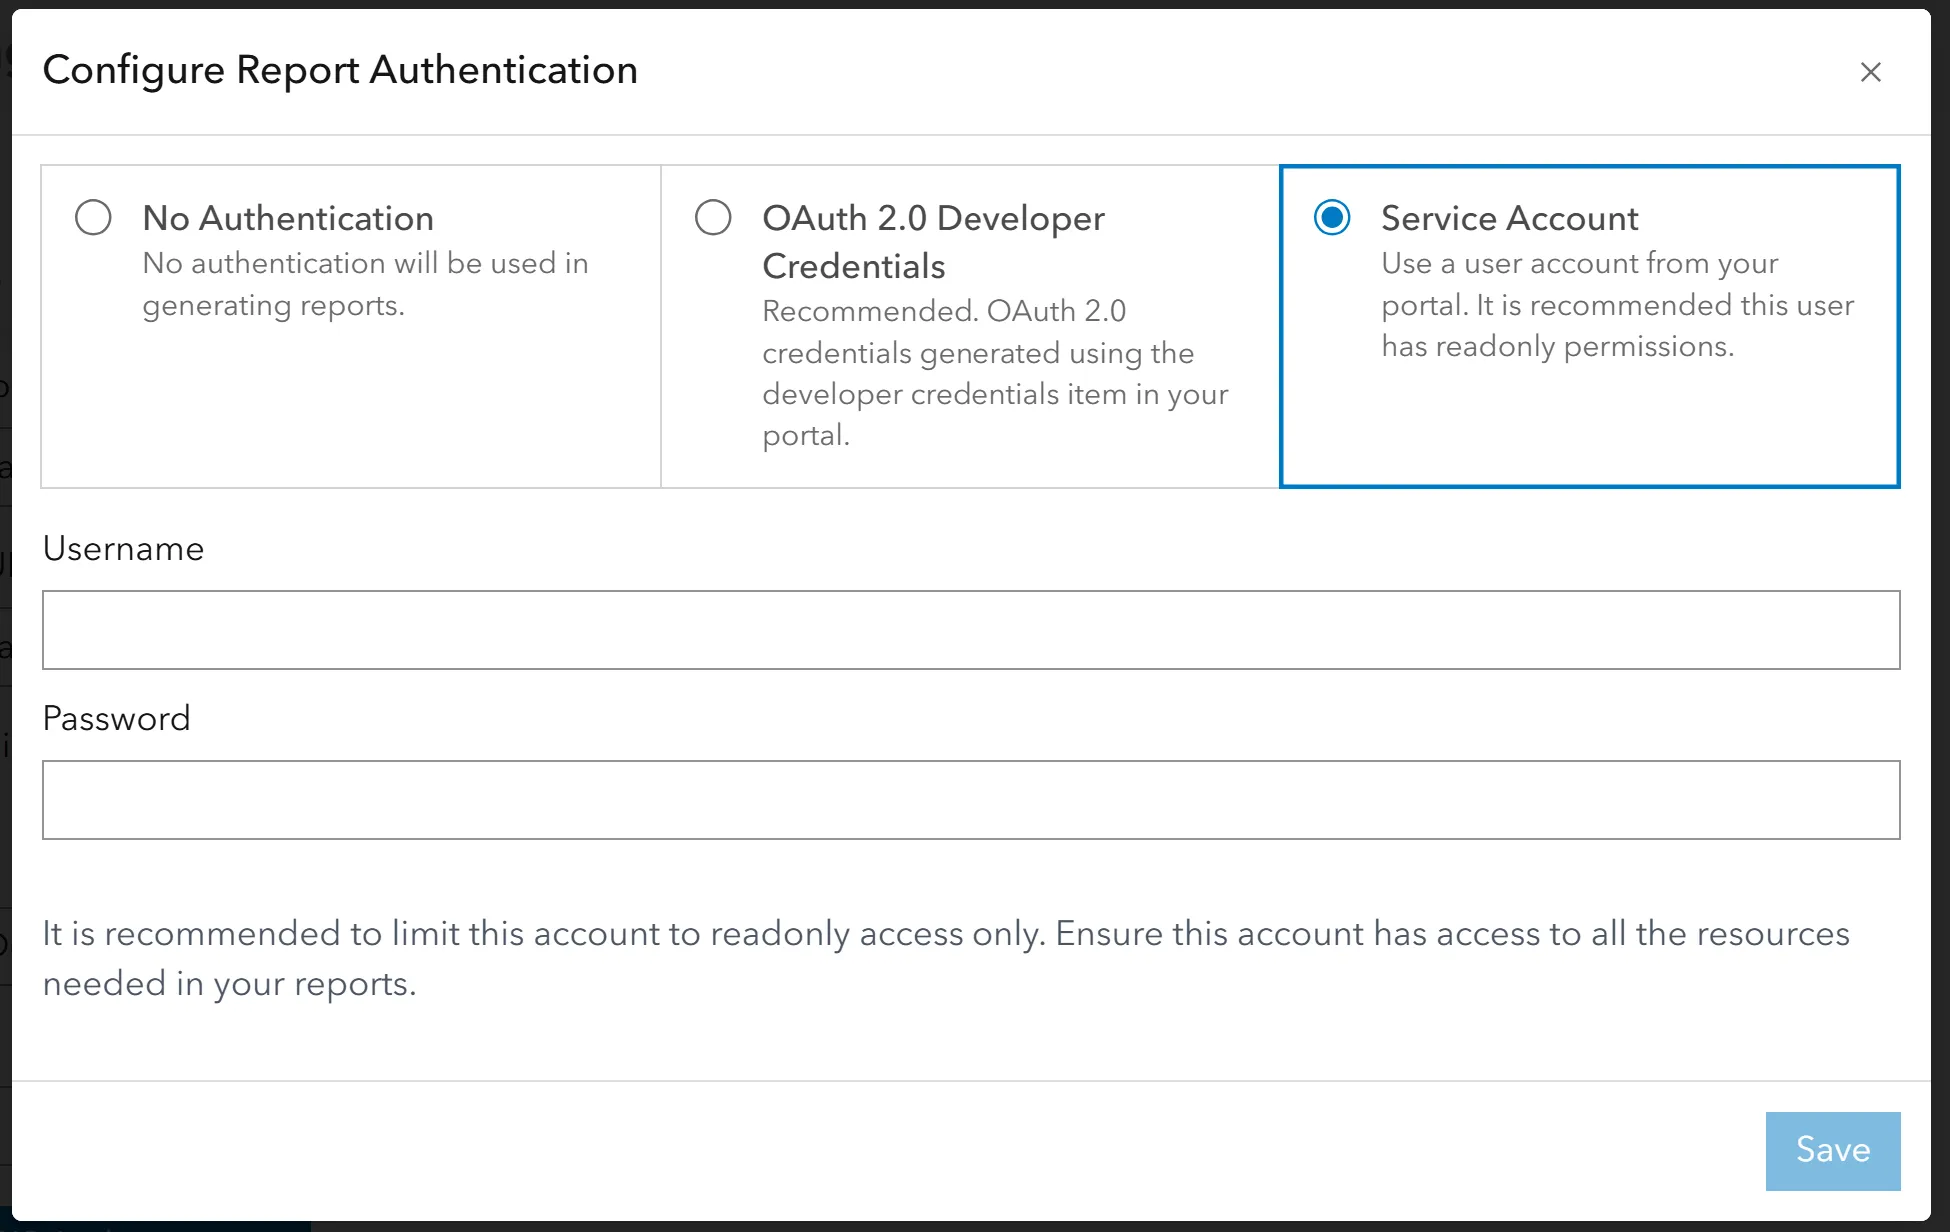
Service account
This is the option to use an AGOL or Portal account to authenticate. This account must have access to all the resources needed in your report, and we recommend limiting this account to read-only access.
Sending Report Emails with LocalMaps (from 3.3)
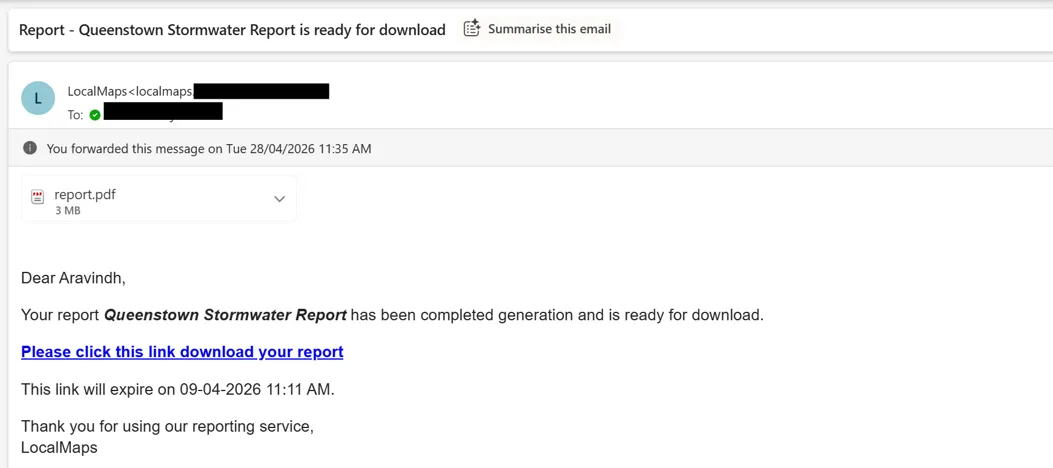
LocalMaps can automatically send reports by email as soon as they’re generated, or on a recurring schedule. This guide walks through setting up email delivery, customising what your emails look like, and scheduling reports to run automatically. Example below
How it works
When a report is generated in LocalMaps, the system can send it directly to recipients by email. The email includes a link to download the report, along with any details you’ve configured, such as who requested it and when it expires. Option to include the generated report as an attachment is available. To make this work, you’ll need to connect LocalMaps to an email server (SMTP). To configure an SMTP server, refer to documentation of your chosen provider. Google Microsoft Outlook
Configure SMTP Settings in LocalMaps
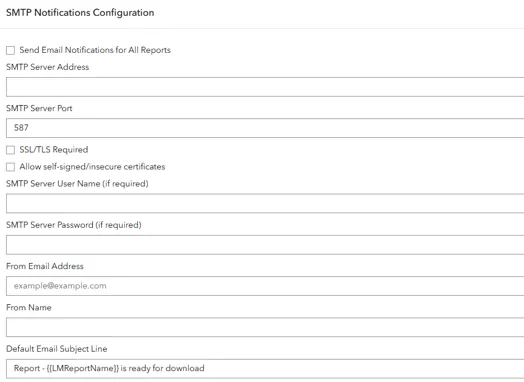
To configure SMTP, navigate to the Settings tab in Reports. Click the button labelled Configure SMTP Settings to bring up the menu.
| Setting | What it is |
|---|---|
| Send Email Notifications for All Reports | Select the checkbox to enable SMTP on LocalMaps |
| SMTP Server Address | The address of your outgoing mail server, e.g. smtp.gmail.com |
| SMTP Server Port | Refer to your SMTP provider documentation |
| SSL/TLS Required | Enable this if your mail server requires an encrypted connection (recommended) |
| Allow self-signed/insecure certificates | |
| SMTP Server Username | The account LocalMaps sends email from |
| SMTP Server Password | The password for that account |
| From Email Address | The email address recipients will see in the “From” field, e.g. reports@yourorg.com |
| From Name | The display name recipients will see, e.g. LocalMaps Reports |
| Default Email Subject Line | As per title |
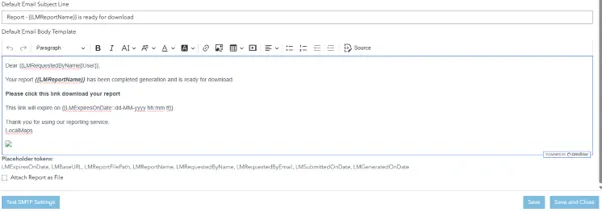
| Attach Report as File | Checkbox to enable/disable |
Report Tokens
| Token | What it inserts |
|---|---|
{{LMReportName}} | The name of the report |
{{LMRequestedByName}} | Full name of the person who requested the report |
{{LMRequestedByEmail}} | Their email address |
{{LMSubmittedOnDate}} | When the report request was submitted |
{{LMGeneratedOnDate}} | When the report finished generating |
{{LMExpiresOnDate}} | When the download link expires |
{{LMBaseURL}} | The base web address of your LocalMaps site |
{{LMReportFilePath}} | The path to the generated report file |
Formatting Dates
By default, dates appear in a standard format. You can customise how they display by adding a format string after :: inside the token:
{{LMExpiresOnDate::dd MMMM yyyy}}| Format | Example output |
|---|---|
dd-MM-yyyy | 09-04-2026 |
dd MMMM yyyy | 09 April 2026 |
dd-MM-yyyy hh:mm tt | 09-04-2026 01:30 PM |
Fallback Text
You can also define fallback text in case a value isn’t available, using ||:
{{LMExpiresOnDate||No expiry set::dd-MM-yyyy}}If the expiry date exists it will be shown formatted; if not, “No expiry set” appears instead.
Attach reports as file
Click this textbox to get the generated report as an attachment with the email.

Test SMTP settings
This sends a test email to the from address
Monitor report generation
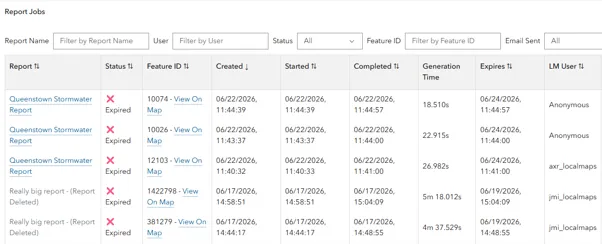
The Report Jobs screen is available under Admin > Reports and gives you a full history of every report that has been generated in LocalMaps. It’s the central place to check the status of reports, see who requested them, and troubleshoot any issues.
Filtering the List
At the top of the screen, you can narrow down the list using any combination of:
- Report Name — Search for a specific report type
- User — Filter by the user who requested the report
- Status — Filter by the current state of the job (see below)
- Filter ID — Filter by a specific ID
Report Statuses
| Status | What it means |
|---|---|
| Processing | The report is currently being generated — check back shortly |
| Completed | The report has generated successfully — click the Download link to retrieve the file |
| Expired | The report was completed but the download link has since expired and the file is no longer available |
| Error | Something went wrong during generation. Hover over the error status to see more detail about what failed. |